

Part of the remodeling of the chart table area on my 45ft schooner Britannia involved making a new section of floorboarding or, to use its proper nautical term, cabin sole. The floor beneath was just rough plywood, unlike the remainder of the boat, which was beautiful teak with white-wood strips. It was perhaps just as well, because in order to reposition the electrical distribution board I had to cut this floor out completely to re-route the wires underneath.
I naturally wanted any new floor to match the boat’s existing sole and scoured the web and any sources of teak flooring with whitewood strips to match the existing floor pattern. Unfortunately, I was unable to locate the exact pattern anywhere. Britannia’s strips are 3/8in wide, and the nearest I could find were 1/4in wide and also spaced differently. I thought using a different pattern would look like a “botched job” and chose not to settle.

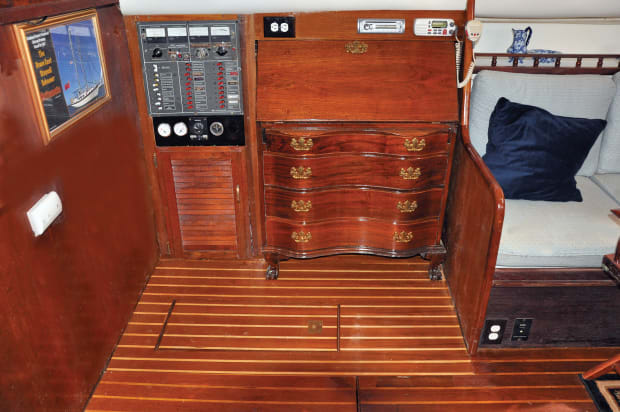
The gaping hole left after the old chart table was removed
The area was not large, measuring only 54in long and 36in wide, and it needed to be ¾in thick to bring it level with the existing floor. I could have ordered a 4ft by 8ft sheet of teak-faced plywood, but it would have cost in excess of $400 and still have no white strips. This would be an expensive section of floor, with nearly half left over and nothing to use it for.
I, therefore, decided to try a different approach using the finest quality sheet of 4ft-by-8ft-by ¾in thick smooth faced plywood I could find in our local hardware store. It cost just $47, and they cut it to my rough size free of charge. I also decided to incorporate a hatch in the new floor, to give direct access to three sea-cocks and a battery beneath.
It would have been difficult to shape such a cumbersome piece of plywood on the boat, so I made a template using some sheets of art board and with its help trimmed the plywood with my table and jig saws back in my garage. When I hauled the floor back to the boat for a trial fit, it dropped in place perfectly. With my new floor now cut to size I painted all the edges and underside of the plywood with two coats of Interlux Primekote two-part epoxy primer to keep out moisture.
That done, I ordered a 4ft-by-8ft sheet of teak veneer. This was “quarter sawn,” meaning the grain is pretty straight along the 8ft length with no swirls or knots in the pattern. It was not paper backed like most veneers, but Okoume wood backed, making it very suitable for flooring and flat sections, like bulkheads. I was advised to let the sheet acclimatize for 24 hours before trying to glue it to the plywood to minimize any shrinkage or expansion once it was in place.
When I first attempted veneering I was unsure how to use these ultra-thin sheets of real wood to cover various damaged and rebuilt surfaces on my 35-year-old boat. Veneering has a sort-of mystique about it, which only master carpenters are supposed to comprehend. In truth, though, it is the easiest of materials with which to instantly improve timber, especially flat areas like bulkheads or floors, since the veneer can easily be cut with scissors and glued in place with standard contact adhesive. The new surface can then be treated the same as any other teak surface, i.e., varnished, oiled or left untreated. The downside is good quality veneer is not cheap. In this case, the sheet I bought cost $157 including shipping. Still, veneering is invariably easier and cheaper than replacing a complete panel of teak-faced plywood.
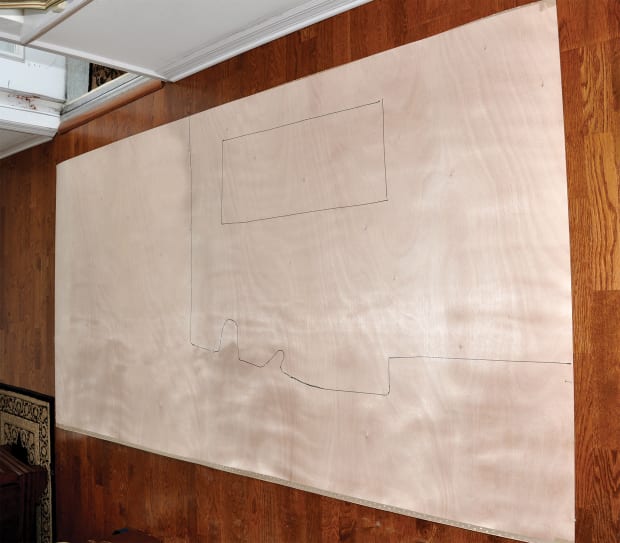
The veneer with the outline of the new floor traced on it
Veneer also offers a great opportunity to be artistic. Just because you are veneering a teak panel, that doesn’t mean you have to re-cover it with teak alone. There are also plenty of beautiful wood veneers available with amazing patterns made out of walnut, cherry and mahogany, any one of which can enhance the décor of any boat.
Having said that veneering is not difficult, there are a few tricks-of-the-trade worth noting. For example, the easiest way to glue veneer to a largish stiff substrate like plywood is to first copy the outline of the ply on the underside of an uncut piece of veneer with a felt tip pen. Then, with the veneer placed flat on a level floor, spread the contact adhesive over the outlined area of veneer and the plywood its going to be attached to. I used Weldwood contact cement, which I poured directly out of the tin and then spread across the two surfaces with a trowel having 1/8in serrations.
When the glue is nearly ready to bond, instead of trying to locate the large wobbly sheet of veneer accurately on top of the plywood, it is much easier to lower the plywood on top of the teak, matching it with the guidelines you drew there earlier. The teak can then be trimmed to size, separated from the rest of the original sheet, turned over and smoothed using a wide blade plasterer’s trowel. A trowel works better than a roller, because most rollers are attached only at one end and the pressure you apply is bound to be a little uneven. A wide blade trowel with the handle in the middle allows even pressure to be applied over the entire length of blade as it is drawn along the veneer from the center outward. This squeezes out any air bubbles, minimizing the chance of future bubbling of the veneer.
With my floor piece, I trimmed the edges using a handheld router with a ½in straight cutter and then edged the hatch with 1/4in wide teak, along with a brass lifting handle to match the rest of the hatches. The veneered board looked superb, but the job was only half done. Now came the tricky bit.
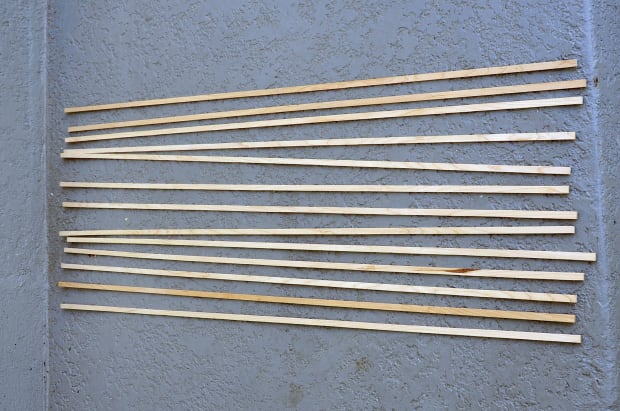
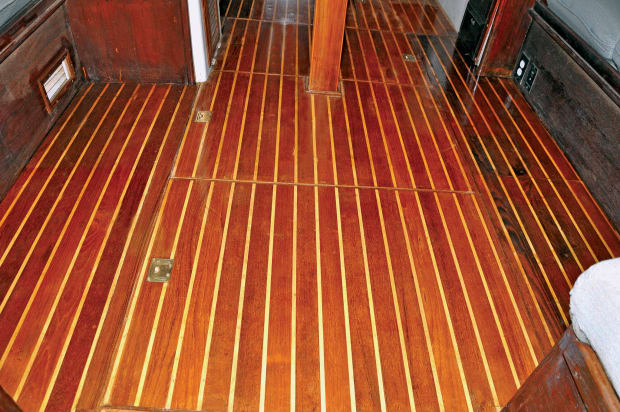
To create the teak-and-holly look I wanted, I somehow had to make 13 individual 3/8 in wide wood strips and set them into the teak veneered plywood; however, I couldn’t find any actual holly timber, either locally or on the web. Fortunately, the actual type of wood didn’t matter that much, so long as it was a hardwood and the right shade to match the existing floor. The nearest match I could find was maple, in 48in long sheets 1/8in thick. Maple is also a white wood like holly, and in fact, some boats have teak-and-maple floors, so I wasn’t much bothered by what it was called because it matched the existing floor extremely well.
To start out, I set up my bench saw with a new 60 tooth 10in diameter carbide tipped blade, which cuts thin timber very cleanly. Using the table saw and its guide, I carefully cut 13 strips out of the sheet, each exactly 3/8in wide. This produced strips 3/8 x 1/8in to form the inlay floor strips.
Next I needed to machine 13 grooves in the teak board to take the strips. For this I used a handheld router, fitted with a 3/8in plunge cutter, which I set to produce a 1/8in deep cut. I taped the end of my vacuum hose to the router to suck shavings out from the tool and prevent them building up in the groove.
To make the cuts, I placed the router level with the centerline where I wanted the first groove, then tightly clamped a stout straight timber board to the floorboard to act as a guide. After that it was just a matter of slowly pushing the router along the guide—a little heart pounding for the first cut. The result was a perfectly straight 3/8in wide groove down the length of the teak board. I repeated this process with a 21/8in (5.39 cm) space between until I had all the grooves machined.
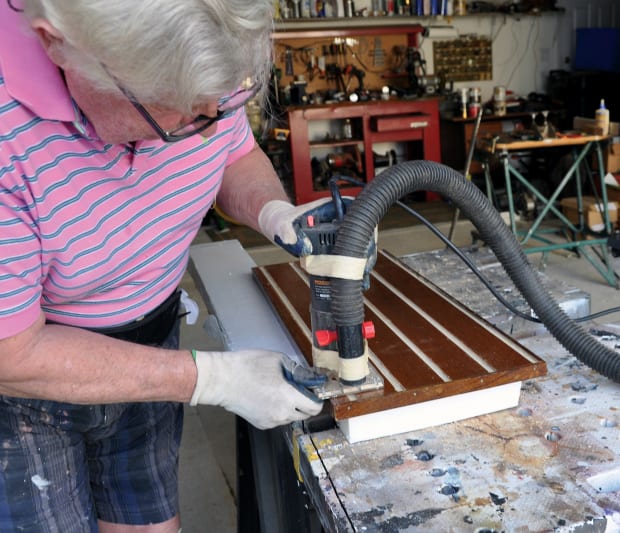
With the grooves cut, I used Titebond premium wood glue to bond the strips into the grooves, which only needed a tap with a mallet to seat them level with the veneer. After letting the glue harden for 24 hours, I lightly sanded the whole sheet with a belt sander with 120 grit paper. Being 1/8in deep, I expect the strips will be very wear resistant. By comparison, the strips in the original cabin sole are the same thickness as the teak veneer, about 1/32in.
To finish my newly veneered floor, I rolled on a first coat of Cetol clear marine wood varnish, thinned with mineral spirits. After that came two unthinned coats, with no sanding in between. Using this approach not only produces a thicker coverage for floor protection, but the resulting slightly coarse texture makes for a nice non-slip surface while still providing a glossy finish.
Finally, I decided to glue a layer of thermal insulation to the underside of the board to minimize heat coming through from the engine area. For this I used 2in thick Rmax Thermasheath foam insulation board with aluminum foil on one face. This has an insulation rating of R6, which is the highest available for this thickness of foam. I glued it to the underneath of the floor using Liquid Nails construction adhesive, which does not melt the foam.
The new floor was then carefully slid in place where it matched the existing sole perfectly. I screwed it down and filled the countersunk holes with teak plugs—job done!
The whole project was a back-aching sort of job with a lot of kneeling down and sawing but well worth the effort to match the existing sole. I’m sure it would not have looked right had I used an odd size ready-made teak flooring. Using veneer was also much cheaper than buying teak-faced plywood. I even had a big piece of veneer left over, which I used to repair other parts of Britannia’s teak.
Ed Note: To read more about the chart table upgrade the author references, see A New Stonehenge in the July 2021 issue of SAIL


